Continuiamo con la nostra serie di articoli che, attraverso esempi pratici e semplificati, dimostrano l’applicazione di strumenti fondamentali nei rispettivi ambiti. È il turno di introdurre la configurazione e verifica di EtherChannel.
Nello sviluppo di questo laboratorio andremo a scoprire come configurare EtherChannel e le sue potenzialità.
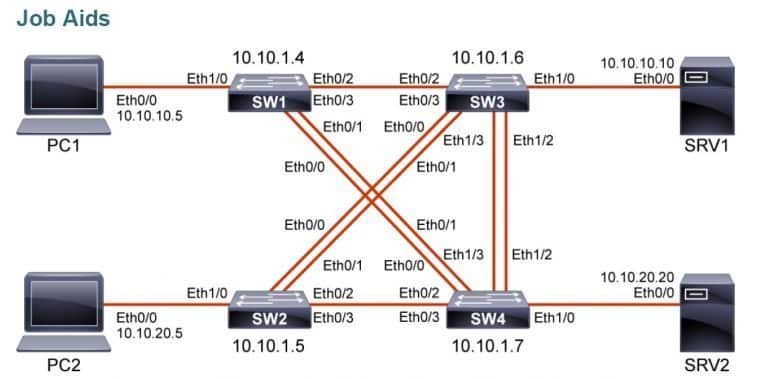
PC1:
IP Address –> 10.10.10.5/24
PC2:
IP Address –> 10.10.20.5/24
SW1
VLAN 1 IP address –> 10.10.1.4/24
SW2
VLAN 1 IP address –> 10.10.1.5/24
SW3
VLAN 1 IP address –> 10.10.1.6/24
SW4
VLAN 1 IP address –> 10.10.1.7/24
SVR1
IP Addresss–> 10.10.10.10/24
SVR2
IP Address–> 10.10.20.20/24
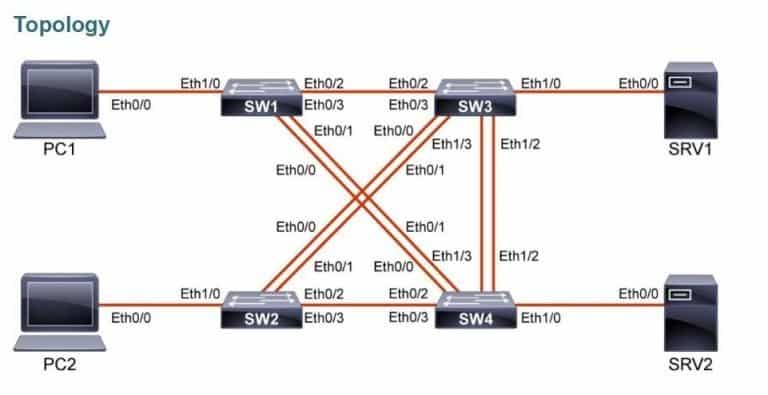
Cominciamo accedendo alla console di SW1 e visualizziamo lo stato delle porte su SW1. Entrambe le porte Ethernet 0/2 e 0/3 sono connesse a SW3.
La porta Ethernet1/0 è invece assegnata alla VLAN 10:
SW1# show interfaces status
Port Name Status Vlan Duplex Speed Type
Et0/0 Link to SW4 connected trunk auto auto unknown
Et0/1 Link to SW4 connected trunk auto auto unknown
Et0/2 Link to SW3 connected trunk auto auto unknown
Et0/3 Link to SW3 connected trunk auto auto unknown
Et1/0 Link to PC1 connected 10 auto auto unknown
Et1/1 connected 1 auto auto unknown
Et1/2 connected 1 auto auto unknown
Et1/3 connected 1 auto auto unknown
Visualizziamo lo spanning-tree per la VLAN 10 su SW1.
Le porte Ethernet0/2 e 0/3 sono entrambe connesse a SW3, ma solo la Ethernet0/2 è nello stato forwardng. Lo spanning-tree sta bloccando la porta Ethernet0/3 per evitare un loop. Solo metà della potenziale banda è in uso in questa coppia di collegamenti:
SW1# show spanning-tree vlan 10
VLAN0010
Spanning tree enabled protocol ieee
Root ID Priority 24586
Address aabb.cc00.0d00
Cost 100
Port 3 (Ethernet0/2)
Hello Time 2 sec Max Age 20 sec Forward Delay 15 sec
Bridge ID Priority 32778 (priority 32768 sys-id-ext 10)
Address aabb.cc00.0b00
Hello Time 2 sec Max Age 20 sec Forward Delay 15 sec
Aging Time 300 sec
Interface Role Sts Cost Prio.Nbr Type
------------------- ---- --- --------- -------- --------------------------------
Et0/0 Altn BLK 100 128.1 Shr
Et0/1 Altn BLK 100 128.2 Shr
Et0/2 Root FWD 100 128.3 Shr
Et0/3 Altn BLK 100 128.4 Shr
Et1/0 Desg FWD 100 128.5 Shr
Con un po’ di dimistichezza, possiamo determinare che il root switch per VLAN10 è SW3.
Ora spegniamo le porte Ethernet0/2 e 0/3 sullo switch SW1.
Su SW1, eseguiamo i seguenti comandi:
SW1# conf t
Enter configuration commands, one per line. End with CNTL/Z.
SW1(config)# interface range Ethernet0/2 - 3
SW1(config-if-range)# shutdown
*Dec 28 09:09:31.692: %LINK-5-CHANGED: Interface Ethernet0/2, changed state to
administratively down
*Dec 28 09:09:31.693: %LINK-5-CHANGED: Interface Ethernet0/3, changed state to
administratively down
*Dec 28 09:09:32.693: %LINEPROTO-5-UPDOWN: Line protocol on Interface Ethernet0/2,
changed state to down
*Dec 28 09:09:32.694: %LINEPROTO-5-UPDOWN: Line protocol on Interface Ethernet0/3,
changed state to down
Spegniamo anche le porte Ethernet 0/2 e 0/3 sullo switch SW3.
Su SW3, eseguiamo i seguenti comandi:
SW3# conf t
Enter configuration commands, one per line. End with CNTL/Z.
SW3(config)# interface range Ethernet0/2 - 3
SW3(config-if-range)# shutdown
*Dec 28 09:10:17.356: %LINK-5-CHANGED: Interface Ethernet0/2, changed state to
administratively down
*Dec 28 09:10:17.356: %LINK-5-CHANGED: Interface Ethernet0/3, changed state to
administratively down
SW3(config-if-range)#
*Dec 28 09:10:18.360: %LINEPROTO-5-UPDOWN: Line protocol on Interface Ethernet0/2,
changed state to down
*Dec 28 09:10:18.360: %LINEPROTO-5-UPDOWN: Line protocol on Interface Ethernet0/3,
changed state to down
CORSI CORRELATI:
- Corso Cisco CCNA;
- Corso CCNP Enterprise ENCOR;
- Corso CCNP Enterprise ENARSI;
- Corso CCNP Enterprise ENWLSI;
- Corsi CCNP Enterprise;
- Corso Fortinet NSE4;
- Corso Huawei HCIA R&S;
Consulta il nostro Catalogo Corsi per Tecnologia oppure fai una Ricerca per Vendor o ancora trova uno specifico corso attraverso il motore di ricerca interno: Ricerca Corsi. Contattaci ora al Numero Verde 800-177596, il nostro team saprà supportarti nella scelta del percorso formativo più adatto alla tue esigenze.
Assegnamo le porte Ethernet 0/2 e 0/3 al port-channel 1 sullo switch SW1. Usiamo il protocollo LACP.
Su SW1, eseguiamo i seguenti comandi:
SW1(config-if-range)# channel-group 1 mode active
Creating a port-channel interface Port-channel 1
SW1(config-if-range)#
Assegniamo le porte Ethernet 0/2 e 0/3 al port-channel 1 sullo switch SW3. Usiamo il protocollo LACP.
Su SW3, eseguiamo i seguenti comandi:
SW3(config-if-range)# channel-group 1 mode active
Creating a port-channel interface Port-channel 1
Abilitiamo le porte Ethernet 0/2 e 0/3 sullo switch SW1.
Su SW1, eseguiamo i seguenti comandi:
SW1(config-if-range)# no shutdownAbilitiamo le porte Ethernet 0/2 e 0/3 sullo switch SW3.
Il line-protocol delle porte fisiche Ethernet 0/2 e Ethernet 0/3 va up. Logicamente l’intefaccia del port-channel 1 passa allo stato up:
SW3(config-if-range)# no shutdown
*Dec 28 09:13:11.268: %LINK-3-UPDOWN: Interface Ethernet0/2, changed state to up
*Dec 28 09:13:11.268: %LINK-3-UPDOWN: Interface Ethernet0/3, changed state to up
*Dec 28 09:13:12.272: %LINEPROTO-5-UPDOWN: Line protocol on Interface Ethernet0/2,
changed state to up
*Dec 28 09:13:12.272: %LINEPROTO-5-UPDOWN: Line protocol on Interface Ethernet0/3,
changed state to up
SW3(config-if-range)#
*Dec 28 09:13:18.543: %LINEPROTO-5-UPDOWN: Line protocol on Interface Port-channel1,
changed state to up
Assegniamo la descrizione “EChannel to SW3” al port-channel 1 su SW1.
Su SW1, eseguiamo i seguenti comandi:
SW1(config-if-range)# exit
SW1(config)# interface port-channel 1
SW1(config-if)# description EChannel to SW3
SW1(config-if)# end
SW1#
Assegniamo la descrizione “EChannel to SW1” al port-channel 1 su SW3.
Su SW3, eseguiamo i seguenti comandi:
SW3(config-if-range)# exit
SW3(config-if)# interface port-channel 1
SW3(config-if)# description EChannel to SW1
SW3(config-if)# end
SW3#
Visualizziamo l’interface status su SW1.
Il port channel è UP su SW1.
Le porte Ethernet0/2 e 0/3 sono ancora viste come interfacce fisiche nei comandi Cisco IOS:
SW1# show interfaces status
Port Name Status Vlan Duplex Speed Type
Et0/0 Link to SW4 connected trunk auto auto unknown
Et0/1 Link to SW4 connected trunk auto auto unknown
Et0/2 Link to SW3 connected trunk auto auto unknown
Et0/3 Link to SW3 connected trunk auto auto unknown
Et1/0 Link to PC1 connected 10 auto auto unknown
Et1/1 connected 1 auto auto unknown
Et1/2 connected 1 auto auto unknown
Et1/3 connected 1 auto auto unknown
Po1 EChannel to SW3 connected trunk auto auto
Visualizziamo l’interface status su SW1.
Il port channel è UP su SW3.
Le porte Ethernet0/2 e 0/3 sono ancora viste come interfacce fisiche nei comandi Cisco IOS:
SW3# show interfaces status
Port Name Status Vlan Duplex Speed Type
Et0/0 Link to SW2 connected trunk auto auto unknown
Et0/1 Link to SW2 connected trunk auto auto unknown
Et0/2 Link to SW1 connected trunk auto auto unknown
Et0/3 Link to SW1 connected trunk auto auto unknown
Et1/0 Link to SRV1 connected 10 auto auto unknown
Et1/1 connected 1 auto auto unknown
Et1/2 Link to SW4 connected trunk auto auto unknown
Et1/3 Link to SW4 connected trunk auto auto unknown
Po1 EChannel to SW1 connected trunk auto auto
Visualizziamo lo spanning-tree per la VLAN10 su SW1.
Le porte Ethernet 0/2 e 0/3 non sono più visibili nello spanning-tree.
Infatti, sono state sostituite con l’interfaccia virtuale port-channel 1:
SW1# show spanning-tree vlan 10
VLAN0010
Spanning tree enabled protocol ieee
Root ID Priority 24586
Address aabb.cc00.0800
Cost 56
Port 65 (Port-channel1)
Hello Time 2 sec Max Age 20 sec Forward Delay 15 sec
Bridge ID Priority 32778 (priority 32768 sys-id-ext 10)
Address aabb.cc00.0500
Hello Time 2 sec Max Age 20 sec Forward Delay 15 sec
Aging Time 15 sec
Interface Role Sts Cost Prio.Nbr Type
------------------- ---- --- --------- -------- --------------------------------
Et0/0 Desg FWD 100 128.1 Shr
Et0/1 Desg FWD 100 128.2 Shr
Et1/0 Desg FWD 100 128.5 Shr
Po1 Root FWD 56 128.65 Shr
Il costo del port-channel è pari a 56, che è molto più basso del costo assegnato alle interfacce individuali, pari a 100.
Il port-channel è nello stato forwarding. Lo stato forwarding, implica che il port-channel è forwarding su tutte le interfacce che sono membri del port-channel. Ricordiamo che all’inizio di questo laboratorio, entrambe le porte Ethernet 0/0 e 0/1 erano bloccate. Esse ora sono nello stato forwarding. Queste interfacce sono collegate con SW4. Questo perchè ora, a causa del port-channel il costo del percorso è minore e quindi le porte sono state selezionate come designated port per questi due link. SW4 su questi due link, invece è nello staot alternate e blocking.
Visualizziamo lo stato completo dell’interfaccia port-channel 1 su SW1.
Da questo output, possiamo determinare che il port-channel è up sulla Ethernet0/2 e la
0/3 e che la banda logica del channel è di 20 Mbps:
SW1# show interfaces Port-channel 1
Port-channel1 is up, line protocol is up (connected)
Hardware is Ethernet, address is aabb.cc00.0530 (bia aabb.cc00.0530)
Description: EChannel to SW3
MTU 1500 bytes, BW 20000 Kbit/sec, DLY 1000 usec,
reliability 255/255, txload 1/255, rxload 1/255
Encapsulation ARPA, loopback not set
Keepalive set (10 sec)
Auto-duplex, Auto-speed, media type is unknown
input flow-control is off, output flow-control is unsupported
Members in this channel: Et0/2 Et0/3
ARP type: ARPA, ARP Timeout 04:00:00
Last input 00:00:00, output never, output hang never
Last clearing of "show interface" counters never
Input queue: 0/2000/0/0 (size/max/drops/flushes); Total output drops: 0
Queueing strategy: fifo
Output queue: 0/40 (size/max)
5 minute input rate 0 bits/sec, 0 packets/sec
5 minute output rate 0 bits/sec, 0 packets/sec
2041 packets input, 162930 bytes, 0 no buffer
Received 1858 broadcasts (0 multicasts)
0 runts, 0 giants, 0 throttles
0 input errors, 0 CRC, 0 frame, 0 overrun, 0 ignored
0 input packets with dribble condition detected
2069 packets output, 158394 bytes, 0 underruns
0 output errors, 0 collisions, 0 interface resets
0 unknown protocol drops
0 babbles, 0 late collision, 0 deferred
0 lost carrier, 0 no carrier
0 output buffer failures, 0 output buffers swapped out
Visualizziamo lo stato dell’ EtherChannel su SW1.
Da questo output possiamo determinare che il numero delle porte in questo port-channel è pari a 2.
I membri sono le interfacce Ethernet0/2 e Ethernet0/3 .Il protocollo che è stato usato è LACP:
SW1# show etherchannel port-channel
Channel-group listing:
----------------------
Group: 1
----------
Port-channels in the group:
---------------------------
Port-channel: Po1 (Primary Aggregator)
------------
Age of the Port-channel = 0d:01h:11m:56s
Logical slot/port = 16/0 Number of ports = 2
HotStandBy port = null
Port state = Port-channel Ag-Inuse
Protocol = LACP
Port security = Disabled
Ports in the Port-channel:
Index Load Port EC state No of bits
------+------+------+------------------+-----------
0 00 Et0/2 Active 0
0 00 Et0/3 Active 0
Time since last port bundled: 0d:01h:11m:39s Et0/2
Visualizziamo il summary dello stato dell’EtherChannel su SW1.
Da questo output, possiamo determinare che il LAyer 2 del port-channel 1 è up sulle porte Ethernet 0/2 e 0/3:
SW1# show etherchannel summary
Flags: D - down P - bundled in port-channel
I - stand-alone s - suspended
H - Hot-standby (LACP only)
R - Layer3 S - Layer2
U - in use f - failed to allocate aggregator
M - not in use, minimum links not met
u - unsuitable for bundling
w - waiting to be aggregated
d - default port
Number of channel-groups in use: 1
Number of aggregators: 1
Group Port-channel Protocol Ports
------+-------------+-----------+-----------------------------------------------
1 Po1(SU) LACP Et0/2(P) Et0/3(P)